Follow this blog with bloglovin

Follow on Bloglovin

June 30, 2013

LIFE | Opps I did It again!

Cue visions of Bitney Spears and jazz hands!
As many other blogspot bloggers have reminded us...googlereader is leaving us high and dry tomorrow 1, July.
As you have noticed... I have been away from TEXTURE blog for sometime (coincidentally enough) my return to posting has aligned with googlereaders retirement (as they suggest to us).  Thankfully life obligations, changes and pressures have subsided for now - BACK TO ZEE blog!  I have really missed chatting with you all so...let us just say I am excited to be back.  I will tell you more about my absents in the coming weeks.  If you follow me on instagram you have an idea.

If you so choose- Stay connected with TEXTURE on bloglovin'

November 23, 2012

ACCESSORIES | copper rings

Rings: Copper reducer & coupling

I have been a bit obsessed with rose gold but could not find anything that I liked.  While in the plumbing section of my local hardware store (looking for parts for a project) I came across these copper fittings. Every now and then I find interesting pieces of hardware that I wear so, appropriating plumbing supplies as jewelry is not exactly odd for me. So, until I can find the perfect rose gold minimal rings these will do.  Bonus- copper (rose gold) compliments all skin tones.

Tip: copper will oxidize over time; the oxidization process occurs even faster when it comes in contact with the skin (oil, salt, and moisture) turns copper dark (sometimes even green). If the copper shows signs of oxidization, sit the fitting in white vinegar  for a few minutes (you should see the copper colour returning) then wash the fitting with water.  To create a barrier between the skin and the copper, paint the copper fittings with a clear nail polish.  This barrier should last several months.  Remove nail polish and repeat the process when the polish wears and the fitting becomes darker over time.

September 14, 2012

DIY | fold over carrier


 Last week I dropped my phone and basically cracked the entire screen. As the phone fell to the ground in that split second I thought of how easy it would have been if I had either put the phone in my pocket or put it in a carry all. As we all know, hindsight is 50/50 so, with the fabric I had left over from my previous shopper bag DIY I decided to make a small catch all bag. 


Materials:
_ fabric
_ grommet (4)
_ scissors (or hole punch)
_ cord
_ hardware (spacer, washer, or etc.) (2)
_ needle & thread
_ hammer

1. cut out and sew together two rectangles of your chosen fabric 
2. cut two holes (or hole punch) on both sides of the fabric
3. install grommets  with hammer and thread the cord through the (4) holes
4. thread a spacer or washer, to secure the ends.  Depending on the hardware glue or sew the hardware

Now, I am off to replace my sad broken phone.

May 6, 2012

DIY | chalkboard coffee table

Meet Ryan.  He likes to draw (a lot).
Last weekend I made the suggestion that he modify his coffee table into a drawing surface with chalkboard paint.  Earlier this week he did just that and it turned out fantastic.

What you need to create this DIY of your own are Chalkboard Paint, and a surface of your choosing.   Chalkboard paint can be found at any hardware, craft, or paint store.  Make sure the surface is clean before applying the paint.  If you are painting a wall or just a small area of any surface use painters tape to maintain a clean line.  Apply two coats in a well ventilated area and allow to dry.

I recently learned about Dry Erase Board Paint so I will definitely be creating drawing surfaces with these two paints for my place soon.

April 21, 2012

DIY | asymmetrical zipper skirt

"The pulpit decried, 'The Hookless Fastener' as 'the Devils fingers.' [because it made it easier] to remove clothing with autonomy" Fashion historian Ronald Knoth.

Thanks to Gideon Sunbacks' invention the "Hookless No.2 " gave birth to one of my favorite structural device.  Gideon would of been 132yrs young Monday of this week, today I honor his foresight and my two favorite DIY thus far this year.  It  is funny how something so mundane as a zipper [today] stirred up so much backlash during its inception.  I personally am glad that the days of corsets, boning, hooks, and clasps are over what torture clothing was for women before zippers.

April 18, 2012

DIY | metallic shopper bag


This bag was a 'accidentally on purpose' sort of DIY.  The original intention for this material was going to be a very structural boxy top but due to the cut and double layering the shape did not flatter me as I envisioned (insert complete lack of knowledge/skills as it relates to fabric construction/tailoring).  I wanted to salvage the material, so as it sat around for several weeks it dawned on me that I could simply sew the bottom and turn it into a tote/ clutch.  What I particularly like about this material is that it sits up freely holding its shape even when nothing is in it.  I tend to fold it over and use it more as a clutch for carrying small items and as a grocery tote.

I am currently working with a new material for the structural top.  DIY to come if it turns out well (fingers crossed).

March 5, 2012

DIY | zipper jacket


I actually own more blazers than I do trousers, but when charity shops are giving them away for a few coins how can I resist?  The only flaw in my blazer obsession, is that I hate owning two of the same things.  This DIY is a simple way to give a new face to a plain blazer.  Though, I have to admit that this was not my original idea.  I was inspired by this image I came across some months ago.

Materials\ (2) zippers, scissors, sewing machine (hand sew), chalk & ruler
1\ Put the blazer on, and mark (in chalk) were you would prefer the zipper to sit on your hips.
2\ Use a ruler to create a straight line on both sides to ensure that the zippers are aligned properly.  Measure the length of the zipper (this will mark the length of the chalk line). I would suggest 12.5-20cm (or 5"-8").
3\ Double check the alignment. Tuck the cut edge under and sew the zipper (closed) on both sides.

Tip\ If you prefer the appearance of an invisible zipper use this tutorial from Sarai Mitnick of Colette Patterns.

The zippers creates this sort of peeling away effect, from structured to organic.  Easily one of my new favorite pieces.

January 13, 2012

COVETING | variation on the white shirt

Source 1  /  2  /  3

December 24, 2011

DIY | gift box

Photobucket
I was having a conversation with a good friend earlier this week on the topic of gift giving.  I have always been the sort of person that valued the thought and creativity in the packaging of a gift sometimes more than the item itself.  So, when I have the time to make and share something with someone, I tend to put a lot of time and thought into the packaging as I believe that  any gift  worth remembering are the ones that make an impression.
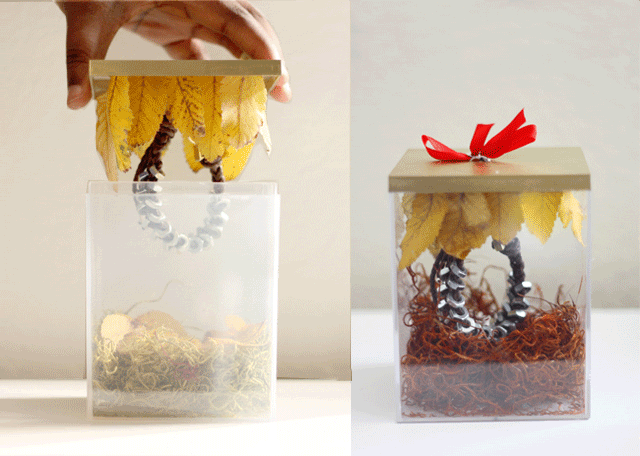
  In this DIY I would like to share with you a gift box and DIY hardware bracelet I made for a former flatmate who will be receiving this tomorrow, just in time for Christmas. 
 
Materials

hot glue gun, spray paint, thin gauge wire, dried leaves,  synthetic moss, plexiglass box, scissors 
1.  drill two holes  that are 5.08cm (1/2") distance from the center on two sides. 
2.  spray paint the top of the plexiglass lid.
3.  Cut 10cm (4") of wire and string through the hole to create a loop for the underside of the lid.
4.  cut off the first 2cm of the stem from the leaves (creates more surface area for the glue to adhere to the lid) glue leaves to the lid.
5.  put a generous amount of the synthetic moss on the bottom of the plexiglass container.  
6.  clip your gift to the wire loop inside the lid.
 -If you do not have a drill handy you can bypass that completely.   
Also, if you are wondering why in the gif the two images look different that is because I made two gift boxes one using a clear plexiglass the other with a frosted plexi also the synthetic moss is of two different colours.


December 23, 2011

DIY | christmas tree and holiday cards


[ 1 ] The ultimate no fuss Christmas tree.

        Oh Christmas tree 
        Oh Christmas tree 
        we really love your minimalism.

[ 2 ] Winter is quickly approaching and all of the beautiful fall leaves are blowing away.  I gathered the last remaining leaves yesterday to create a DIY holiday card. 

What are some things you all have DIYed this holiday season?